
How to Remove Chromatic Aberration
Have you noticed color glow around objects in your image? It's a chromatic aberration, often called "color fringing", that can turn a great photo into a distorted mess. But don’t worry — preventing and correcting it is easier than you might think. Below, we’ll break down ways to avoid color fringing during shooting, as well as how to fix chromatic aberration in post-production.
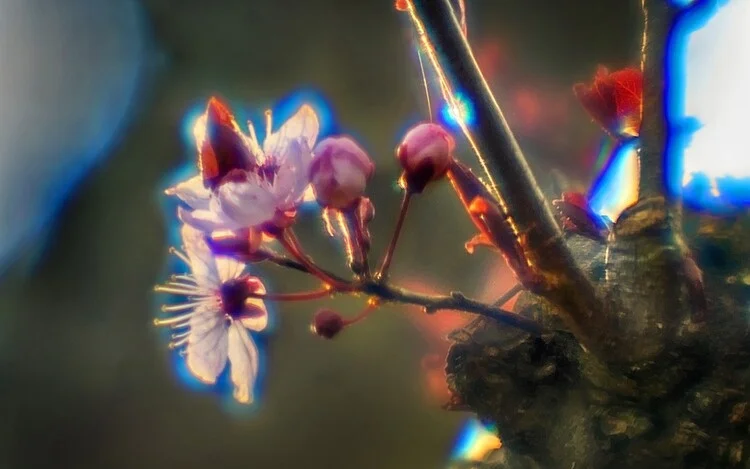
Unwanted bluish halos stealing the flowers' charm
What is Chromatic Aberration?
This effect often happens when your camera’s lens fails to bring all colors of light into a single focal point. This creates weird, colored edges — usually purple or green — around subjects of your image. You might notice it around tree branches against a bright sky or along the edges of buildings in sunlight.
How to Minimize Color Distortion During Shooting
The best way to deal with colored fringes is to avoid getting them in the first place. Here are some practical tips to prevent it:
- Invest in Quality Lenses
- Avoid Extreme Zoom
- Shoot in RAW
Cheaper lenses often lack advanced features to minimize color fringing, making this effect more noticeable. If you can, invest in achromatic lenses or lenses with low-dispersion glass elements. While they might cost more, the investment pays off in better image quality and fewer editing headaches.
This color reproduction issue is more noticeable when zooming in. Instead of relying heavily on zoom, step closer to your subject and reframe the shot. Later, you can crop the image and get a closer view without increasing the risk of color fringing.
RAW files contain more image data than JPEGs or PNGs. This allows you to make precise adjustments during photo editing to correct chromatic distortion without losing quality.
How to Fix Chromatic Aberration in Post-Production
If color fringing sneaks into your photo, don’t panic. In the following, you'll learn how to remove chromatic aberration with PhotoWorks in just a few simple steps.
- Load your color-fringing image into the software.
- Switch to the Tools tab and select the Chromatic Aberration tool.
- Click the Auto Correction button to remove the color distortion automatically.
- Adjust the Purple and Green sliders if necessary to fine-tune the effect.
- Once satisfied, click Apply and save your enhanced photo.

Chromatic aberration correction using PhotoWorks in action
Now that you know how to fix color fringing, the occurrence of this problem is not going to be the end of the world for you. With these techniques, you can remove chromatic aberration in post-production, or prevent it from happening during shooting.
Explore more editing features available in PhotoWorks full version. Easily save those photos that you thought were beyond fixing and make them look amazing.
