How to Add a Christmas Background to a Picture Like a Pro
Want to make themed holiday postcards and lovely Christmas dinner invitations to send to your loved ones? Or do you want to create a celebrative post for your blog but don't have the money or time to organize a professional photo shoot? Just replace the background of an existing photo you like with a Christmassy one. If that seems like a brilliant idea to you, you’re in the right place!
We'll show you how to add a Christmas background to a photo in a few steps with PhotoWorks, a powerful photo software! You don’t need to be a professional photo retoucher to change backgrounds in this program. The software makes the editing process quick and easy for users of any skill level since it has an intuitive interface and all the necessary tools under one roof.
When it comes to giving your photo a Christmas background, the major advantage of the program is that it will do most of the work for you. Leave some strokes and the intuitive software will automatically remove the backdrop and your photo will turn into a studio-level postcard full of the magical holiday atmosphere. But that’s not all! Below, you will also find out how to achieve a similar result on Mac, iOS, Android, and online. Stay tuned!


Replace your photo background with a Christmas one
How to Put a Christmas Background on a Picture: 6 Steps
In this easy-to-follow guide, we’re going to show you a fast way of background replacement. You’ll be able to practice editing your photos immediately after reading the tutorial and create wonderful postcards for your friends and family.
Step 1. Get Started with PhotoWorks
To begin with, download and install PhotoWorks' free trial by clicking the green button below. Once on the startup screen of the editor, choose Open Photo or simply drag your image to the workspace from a folder.
Step 2. Specify the Object in the Photo
Switch to the Tools tab and pick the Change Background tool. Adjust the size of the green Object brush with a slider for your convenience. First, work with the foreground. Mark the objects or people in the photo with the help of the green brush. Don’t paint over every single detail since the program will determine the edges by itself. Use the eraser to remove unwanted strokes.
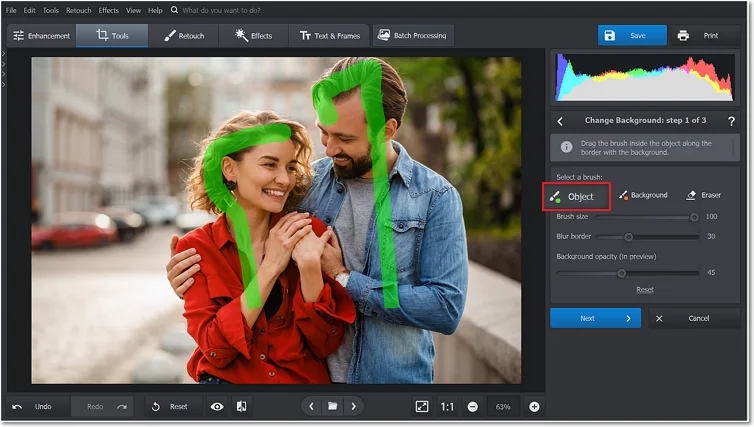
Paint over the object you want to preserve in the image
Step 3. Mark the Photo Background
Switch to the red brush and adjust its size just like you did with the green one. Mark the background you want to replace. Then let the software remove it. Drag the Blur Border slider to the left to make the result look more organic. Decrease the background opacity to see the changes better. Hit Next.
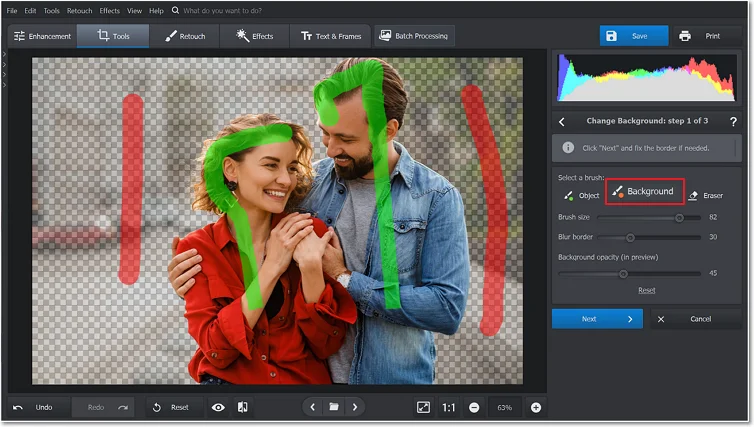
Stroke over the area you want to remove
Step 4. Correct the Object’s Edges
In the next stage of the process, use the green brush to restore any details erased by mistake or the red brush to remove background leftovers. Click the Next button. Drag the Blur Edge slider if you want to adjust the edges’ softness and the Extend Edge slider to make them wider or narrower.
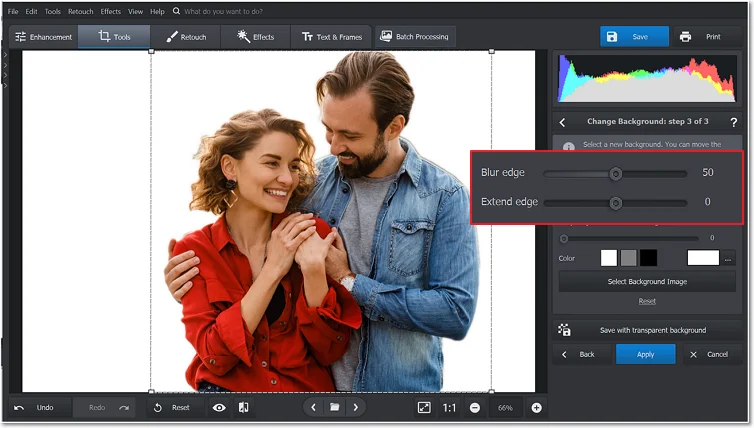
Adjust the object edges to provide a smoother blend
Step 5. Add a Christmas Background to the Photo
When your photo with a transparent background is ready, click the Select Background Image button. Here upload а Christmas scenery from your PC or Mac library and use it as a new background. Then hit Apply. Adapt the object’s colors to the background with the corresponding slider to make your image look organic.
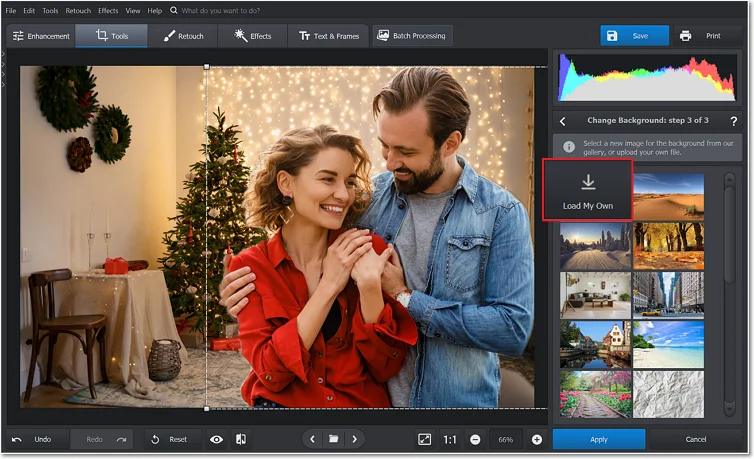
Give your photo a joyful background with a Christmas tree
Step 6. Save Your Christmas Picture for Posting
If you want to make your image look more attractive, apply different photo effects and color correction presets. You can easily do that in PhotoWorks. When you’re satisfied with the result, save your image. Depending on your goals, choose the desired image format: JPEG, PNG, BMP, or TIFF.
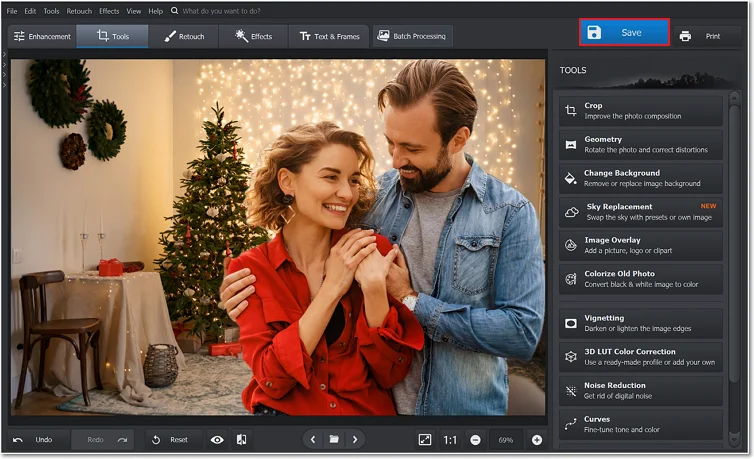
Click the Save button and share your holiday season photo with friends
If you think your photos are still not festive enough for Christmas, PhotoWorks has other features to help you make them look stunning. You can frame a picture with a border and design a custom postcard for your family or create an invitation for friends for a dinner. Want to make your Xmas image more personalized? Adding captions to photos will help you with this task. Think about important dates or Christmas wishes and just type them in. You’ll find diverse options in PhotoWorks to stylize your text.
And that’s not all. Want to make your image look more playful? Put a sticker on a picture from PhotoWorks’ built-in library. In this program, you can complete captions with callouts and banners or add some cliparts using the Image Overlay feature. If your pictures still lack a spark, we recommend you add filters to your photos. The program offers a variety of them, and they will help you convey the desired mood.
Other Ways of Adding a Christmas Background to a Photo
Want to explore other options? Keep reading to find alternative ways to give your photo a Xmas background. Let’s start with Picsart, a web-based photo editor powered by AI. It offers diverse editing tools suitable even for total beginners: photo effects, adjustment tools, and animation. You can easily learn how to put a Christmas background on a picture with this editor. Just click a single button to remove the backdrop. Then work with layers to add a background to your photo. However, you’ll need a subscription to access the premium design tools.
Prefer editing photos using your smartphone? Try Magic Eraser Background Editor, an app for iOS that deals with the task in seconds. It will easily remove selected areas and pieces of a particular color. But, full functionality is not free. Besides, the app specializes only in background removal. So you will need supplemental editors to add your picture to a Christmas background. One of such is Christmas Photo Frames. It has various effects to make personalized Christmas cards with icy patterns. But you can use only the app’s built-in backgrounds. This editor also requires a subscription to be used to its full capacity.
Want to edit your picture quickly without switching between two or more apps? Use LightX, a smart photo editor for Android. Like any reliable desktop editor, this app will help you blur the background, decorate your image with various stickers, create photo collages, and blend 2 images. It will also automatically remove the background of your pic. But you’ll need a subscription to access this feature. Also, be prepared that separating the object from its background on a small screen might be challenging.
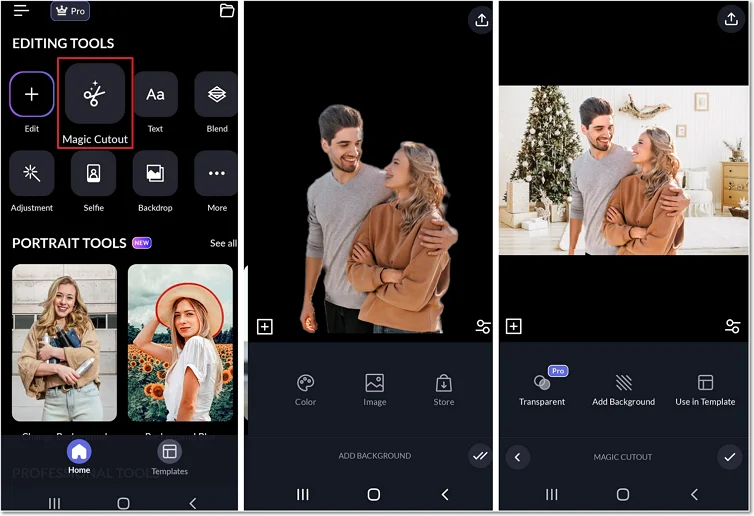
Create an adorable couples picture for Christmas in LightX
If you’re looking for a photo editor for advanced users and professional photographers, try Photoshop that works on both Mac and Windows. The software has many professional features like the Magic Wand quick selection and intelligent retouch tools. Regarding background replacement, you can seamlessly remove your dull scenery and add a Christmas background to your photo in Photoshop. But this editor can be overwhelming even for professional photographers because of its many drop-down menus and the diversity of tools. Moreover, Photoshop is available only with a monthly subscription, which won’t suit everyone.
Final Thoughts
You’ve just learned how to add a Christmas background to a photo on any device. Need help making up your mind? Get Photoshop if you are a seasoned photographer who edits images for profit. Don’t want to download additional programs? Settle down with the online Picsart. Looking for convenient smartphone apps? Get LightX for Android or Magic Eraser Background Editor for iPhone. Want to have more virtual Christmas decor and other creative options at your disposal? Then the Christmas Photo Frames app for iPhone and iPad is your go-to.
However, if you are a PC or Mac photo retoucher who prefers convenient and budget-friendly software with all the features in one place, give your preference to PhotoWorks. The program is suitable for users of any skill level and budget.
It’s all up to you what editor to choose for your post-production. Either way, we hope the article was helpful, and that you finally found what you were looking for.
Want to add a Christmas background to a photo?
Do it in the intelligent photo editor today!

