How to Add a Logo to a Photo with Ease
Imagine you put lots of effort into getting a perfect shot, but a few days later you notice it here and there on the Internet, without any credit given to you. Sad situation, huh? It harms not only your own ego, but your brand and fame. What’s the best way to prevent other users from stealing your work?
Add a logo to your photo. It's a simple yet effective measure. What’s more, it doesn’t have to be super expensive or time-consuming, since you can stick a logo without Photoshop. With an easy-to-use photo editor, you can perform that action in no time, saving your money and nerves. We suggest taking a look at PhotoWorks. This editor combines ease of use with powerful tools that let you not just retouch a photo but also put a logo on your picture in a very simple way. Besides, it allows to brand multiple photos at once. Neat, isn't it? In this article, we'll have a look at how to add logos to your pics with PhotoWorks, but will also tackle a few alternative ways.
Here is an example where we added a logo with PhotoWorks:


So, how to add a logo to a picture on Mac or Windows with PhotoWorks? Here are the steps to follow:
Step 1. Download PhotoWorks
Let’s get started. Download the free trial of PhotoWorks and install the program. Just follow the steps provided by the wizard. Once the program is installed, you are ready to personalize your work.
Step 2. Find or Create Your Logo
Next, you need to choose an appropriate logo. Simple lines and an interesting concept is key: they will draw attention to your logo and make it easy to remember. Order a logo from a designer, draw it yourself or pick a ready-made one from a stock - the choice depends on your taste and budget.
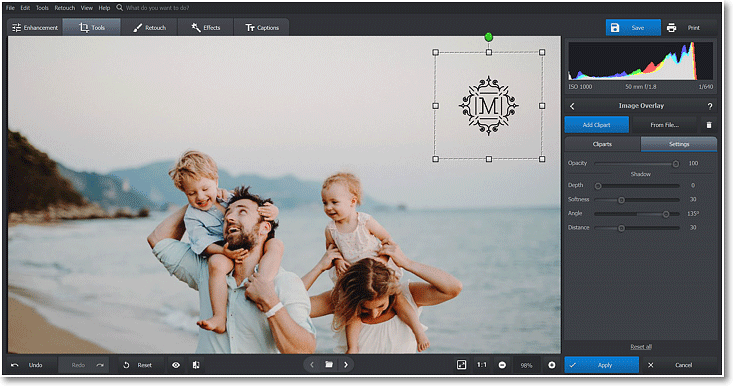
Our colleague, a travel photographer, will apply his logo to a photo
Regardless of the choice you make, remember to save your logo with a transparent background in the PNG format. This is the standard for all logos.
Don’t have much time to search for free logos on the Web? PhotoWorks offers a large collection of royalty-free clipart. Pick the one that suits your needs and use it as a logo.
Step 3. Add the Logo and Customize It
Open your photo in PhotoWorks. Click on the Tools tab and select Image Overlay. Choose Add Image from File and select the logo from the folder on your PC or Mac.
You can also add captions to pictures to promote your name and increase brand awareness. And 70+ text styles available in PhotoWorks will help you make the logo unique and easily recognizable.
Choose the best place for the image: you can put it into a corner, so it won’t overlap the photo itself. Afraid that people can crop the logo out? Then lower the logo opacity and place it closer to the center.
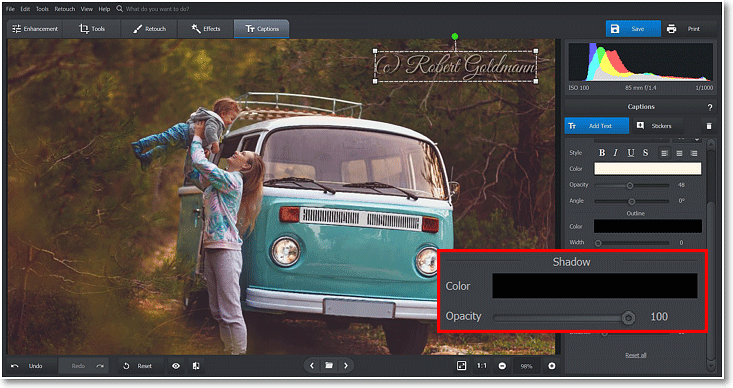
Decided to add a text logo? Give it a shadow to make the caption readable
Experiment with different positions and settings until your logo looks professional and doesn’t distract the viewer from the photo itself.
Step 4. Get Your Hands on Finished Logo
Satisfied with the result? Click Apply. Now hit the Save button in the top right corner, name your image and it’s done!
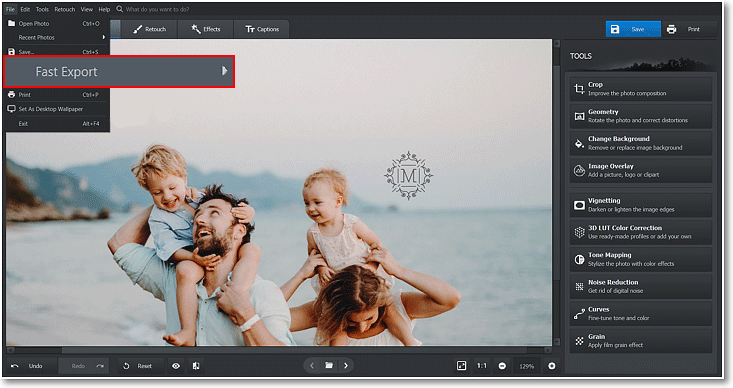
You can also use Fast Export to quickly save your image
By the way, PhotoWorks offers non-destructive editing, which keeps the original images safe while you’re adding logos to your photos. So you can be sure you will always have the original image without any changes.
Need some visual aid to get the process of picture branding in PhotoWorks? Then have a look at this short tutorial:
Think that branding a picture at a time is too time-consuming? PhotoWorks has a quick solution. With it, you can add a logo to dozens of your images simultaneously. It's easy - just find out how to edit a bunch of pictures at once with this smart software.
If you run an Internet shop and create pictures of your goods with the company’s logo, then this PhotoWorks feature will be extremely useful to you. By the way, you can not only place a logo, but make a photo background transparent in just a few strokes as well.
Now you know how to put a logo on a picture without Photoshop. Apart from sticking logos, you can do tons of other things with PhotoWorks: from simple color balance adjustments to deep portrait retouch. Apply automatic correction, fix perspective, remove unwanted objects, get rid of shadows in pictures and much more.
How to Put a Logo on a Picture Without Photoshop
Want to try other ways of branding your photos? No, we definitely won’t be suggesting using Photoshop. Instead, we’ll teach you how to put a logo on a picture with other nifty tools. Let’s start with the popular online service PicMonkey. First, you need to upload your picture to this web app, then hit the Graphics button. Here you can either add an already existing logo or create one yourself using the built-in clipart and text options. Add shadow or outline to your design or make it semi-transparent. Finally, save your branded pic.

Create your own logo using classy built-in elements and cliparts
Another way to add a logo to a photo involves another well-known program. We’re talking about MS Paint. Here’s a little guide for you. First, open the logo file within the software. Next, draw a selection around the logo using the corresponding tool. Copy it. Now open the picture you want to brand and paste the logo onto it. Find the perfect spot for your logo, then save your image.
If you shy away from desktop programs and online services, then consider branding your images with mobile apps. If you are a proud iPhone user, go with eZy Watermark Photos Lite. With it, you can create your own logos using the app’s tools, then brand your picture with a single tap - either one by one or a bunch of them at once. In case you prefer Android-based phones, then LogoLicious is your choice. Its workflow is similar to its iOS counterpart - you can design your own logos and add them to your pics in an instant.
And this is it - now you know how to put a logo on a picture without Photoshop. Use this knowledge right away to make sure that from now on your images will be protected from theft or branded for promotion.

