
 Download
 Download
How to Darken a Photo Without Photoshop
Are you searching for a way to give your image a special vibe? A cool idea is to darken your photo as a whole or some parts of it instead! And in this article, we will teach you to do both. You won’t even need any advanced programs like Adobe Photoshop because we will show you how to darken a picture in a more easy way. The tool you'll need is called PhotoWorks. This AI-powered program requires no editing experience, so even a newbie will be able to do pro-level photo modifications with it.
Want to shift the focus to the center of your picture and obscure the rest? A cool way of doing that is vignetting - darkening the corners of your photo. Consider exploring a detailed walkthrough on how to fade the edges of a photo in case vignetting is what you are interested in.
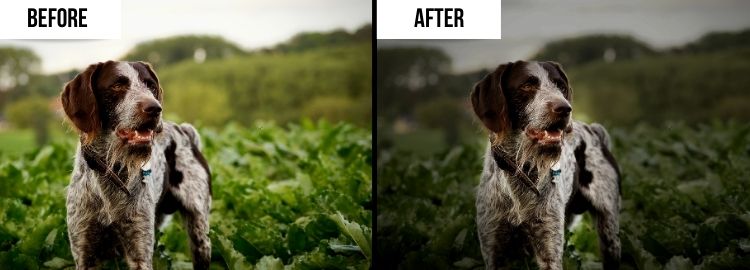
Make your photo darker to give it an artistic touch
In a second, we will go over 3 different ways you can darken your image in PhotoWorks. So we recommend that you download this program before we get started. Install the free trial of PhotoWorks and explore the powerful software for yourself.
Now that you are fully set, let’s move on to making your photos darker. You will see that with PhotoWorks it’s a piece of cake.
Way 1. How to Make the Entire Image Darker
Did your photo turn out too bright? Or are you trying to achieve the twilight effect? Darkening the whole picture is a great idea in both cases. Here is how you can easily do that in PhotoWorks:
- Run the program and import your photo on the startup screen. Or you can just drag and drop your photo in.
- Stay on the Enhancement tab and find the Exposure slider. Drag that slider to the left to make your picture darker.
- You can further play around with the Highlights and Shadows sliders to make the objects in the picture more clear and add depth to your shot. But if you are satisfied with the result, hit the Save button, and you will be done.
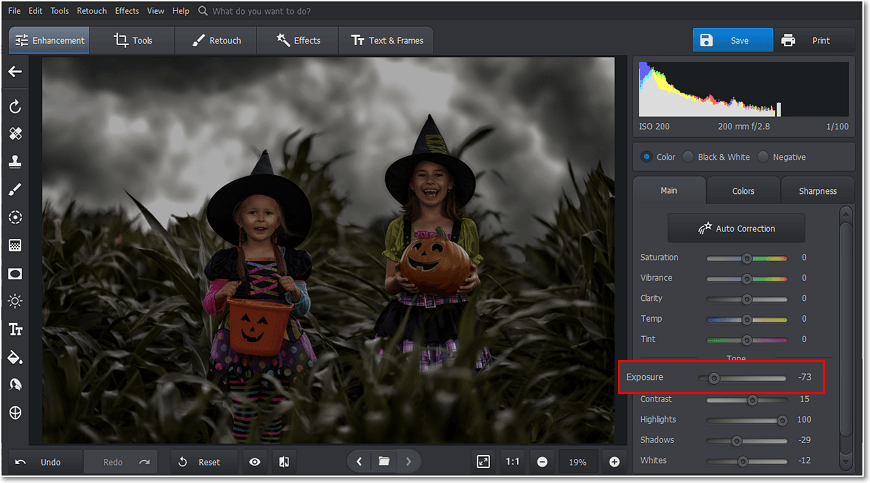
Create a twilight photo effect by darkening your shot
Want to save money on post-production? Darken your picture in GIMP for free. And in case you prefer working on your pics online or just want to avoid downloading extra programs, try PineTools image darkener.
Had a bad angle while shooting, and your photo turned out slanted? Learn how to straighten a picture in PhotoWorks and get your image ready for sharing.
Way 2. How to Darken a Part of an Image
Did glares get into your shot? Did the sun spoil a beautiful photograph? PhotoWorks has you covered. Here is a tutorial on how to darken particular parts of your picture:
- Once you are on the startup screen, open the photo you want to edit.
- Switch to the Retouch tab and select the Adjustment Brush tool. Stay on the Basic tab and set the Size, Opacity, and Feather of the brush. The higher you set the Feather, the better the darkened area will blend.
- Draw a selection over the part of your photo you want to obscure. Then, play with the exposure slider to darken it. You can paint your selection with a specific color if you go to the Tone Mapping tab.
- Click Apply and Save once you are fully satisfied with the result.
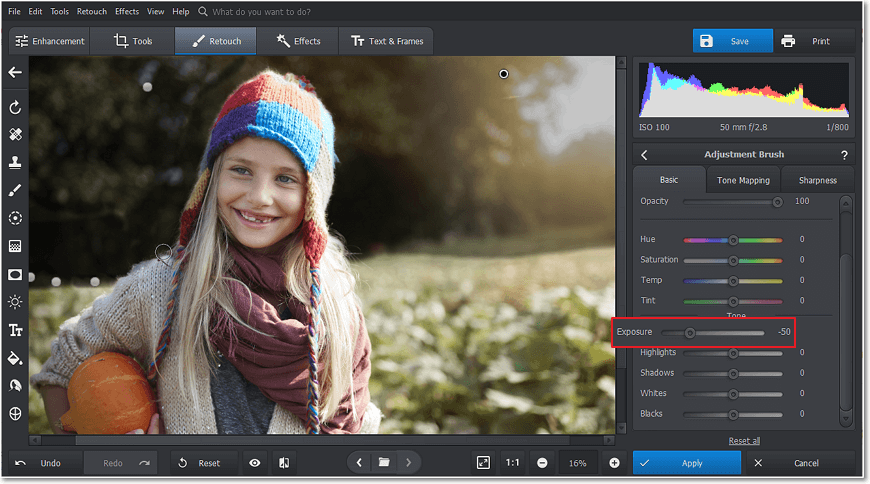
Darken some areas of your photo so they do not steal attention from the central object
Making some parts of your image dark takes a bit more time than it would for the whole photo. However, the process is still pretty clear and easy. So you will surely cope with the task even if you never did anything similar before.
Way 3. How to Darken the Background of a Picture
Want to put the photo’s object or model into focus by darkening the background? Follow the step-by-step walkthrough to learn to do that in PhotoWorks:
- Open the image you want to edit within the software and go to the Retouch tab.
- Select the Radial Filter tool. Set the Feather and choose Outside processing.
- Draw a selection of a certain size and place it over the photo’s object.
- Adjust the Exposure slider to darken everything around the selected area.
- Like the result? Hit Apply and Save. Now, it’s time for you to share your picture!
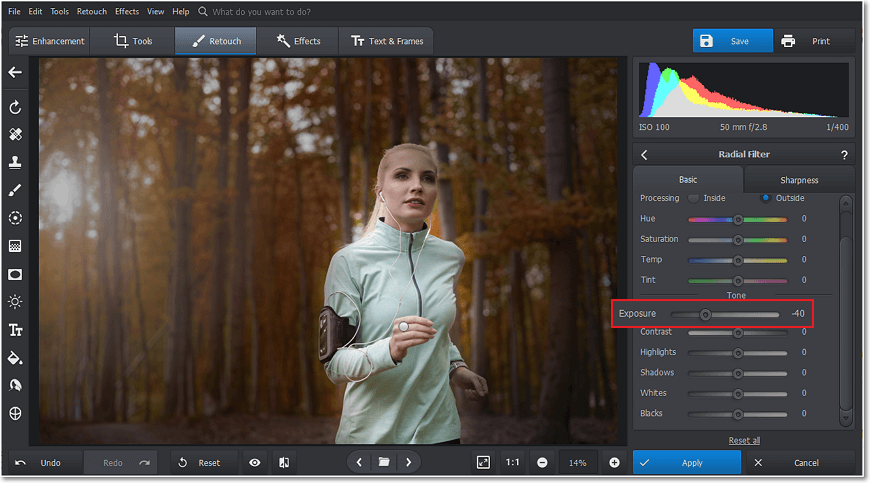
Use the Radial Filter to emphasize the most important area in a photo
See? Making the background of a photo dark is super fast and easy. All you have to do is to choose the area that will stay untouched and move a slider to darken the rest of the photo. However, the whole picture looks much more put together when you apply the Radial Filter.
By now, we have gone over all the ways of making a photo darker with PhotoWorks, and you are fully prepared to work on your own image. The process will take you only a couple of minutes. In case you feel that your pic needs more editing, use PhotoWorks to fix that, too. The smart editor is a lot more than just a photo darkener. You can also use the program to color correct and crop your shots, retouch portraits, put frames and stickers on your pictures, and much more.
Did you darken your picture to place a quote or a poem over it? Learn how to add captions to pictures in PhotoWorks so you can do the entire job in a single program. Did you want to place smaller images over the dark background? Well, you know the drill. Put one picture on top of another in PhotoWorks and save a lot of time in the end.
