
 Download
 Download
How to Create a Watermark for Photos - Best Ways in 2026
You spend all this time taking and editing your shot to get a breathtaking photograph. And after you’ve presented your masterpiece to the world, you discover that someone shamelessly used it without your permission. Isn’t that unfair? Don’t let that happen to you in the future.
Making a watermark for your image is the perfect way to claim your copyright and protect your photograph from lazy thieves. Besides, it helps people who appreciate your work to find you and order your service.
Today, there are hundreds of programs that can help you create a watermark for photos, so it might be a bit challenging to find the right one. The great news is that in this article, you will learn how to create a watermark with 6 handy tools: free and paid, advanced and easy, online and offline. So no matter what your background and preferences are, you will certainly find the best one for you personally. Sounds good? Let’s get started then!
What It Takes to Make a Good Watermark
You might be wondering what makes a signature logo look professional. Well, here is a list of recommendations that will help you to make a good watermark for your images:
- Go with a logo or text. While choosing the watermark style for your images, you might take 2 directions: add your name and website or insert a logo of your photography company as a watermark instead. The good thing about the first option is that it will be easier for people to identify the photo’s author and contact that person. As for a logo, it might be quite difficult to read any text in it if you post a smaller copy of your photo with a watermark on social media. However, it will help to emphasize your artistic style.
- Choose a suitable font. In case you decided to go with text, try to find a font that would reflect your photography style. Do not place a funky-looking text on your photos if they have a casual or official style and the other way around. No need to make your watermark overly romantic if your intended audience is teenagers or businesses.
- Find an appropriate size. Keep in mind that your logo should not steal the focus away from your photo. Your main goal is to promote your work. Try to adapt your watermark size so that it looks neat against the background and doesn’t attract too much attention.
- Adjust the settings. Your watermark should look like it is a part of your photo. A logo or a sign that looks out of place will be the first thing the viewer will look at. Besides, a watermark that stands out degrades the aesthetics of even the most picturesque shot. Thus, do not choose bright colors and try to blend your watermark by adjusting its opacity.
- Find the right place. Remember that many people are crafty enough to erase or cut out watermarks from your copyright images. So try to find a place in your photograph where it would be difficult to do that. That would usually be a spot with textures or small elements.
Now that we have gone over the components of a good digital signature, it’s time for you to find out how to make a watermark for photos yourself. Use the content to easier navigate the 6 tutorials:
- 1. Make a cool watermark in PhotoWorks
- 2. Use Photoshop to create a pro signature
- 3. Watermark your pic with ease in MS Word
- 4. Brand your image in Lightroom
- 5. Protect your photograph using GIMP
- 6. Add watermarks to your images online
Go over all the ways to learn the features of all the tools. That will help you choose the best one according to your budget, preferences, and needs.
Way 1. How to Create a Watermark with PhotoWorks
Are you trying to find a tool good enough for regular editing but you have a limited budget? No problem, PhotoWorks is exactly what you were searching for. It is a program packed with professional features. But the smart AI makes them super easy to use even for amateurs. Besides, the software is pretty cheap in comparison to similar programs. As for watermarks, you can make your own in just a couple of clicks and save it as a template for later use. Intrigued? Let’s move on to the tutorial on this program:
Step 1. Download PhotoWorks and Run It
Click Download and get a free trial of the program. Follow the wizard instructions to install it, then open the software.
Step 2. Open Your Photograph
Once you are on the startup screen, click Open Photo and choose the image you want to protect. Or you can just drag and drop your picture from a folder. In case you want to switch between pictures in the folder, use the content navigation feature.
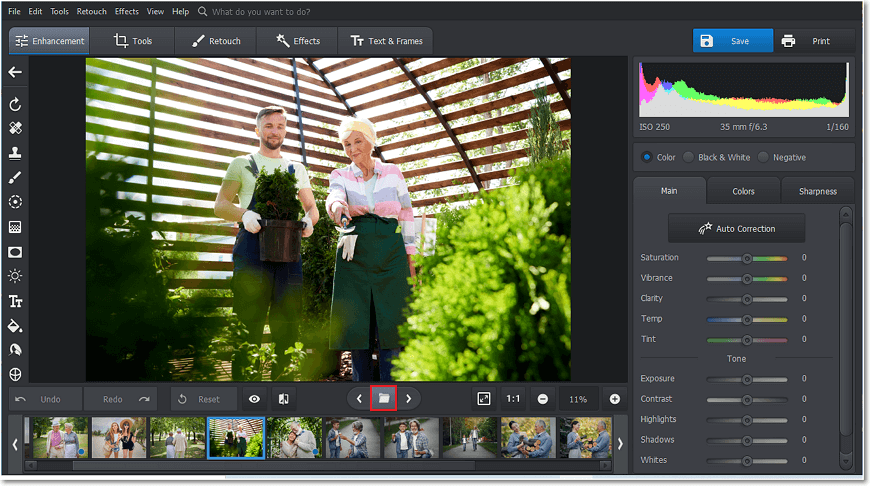
Switch between pictures to put your watermark on all of them
Step 3. Make a Watermark of Your Design
Go to the Text & Frames tab and choose the Text tool. Type in your name or your studio name. Then, choose a premade text style under Styles, or design a logo of your own. Play around with the properties of the logo: color, opacity, shadows.

Use built-in stickers to give your text a nice background
Step 4. Save Your Watermarked Photo on Windows or Mac
Satisfied with the result? Go to Templates and save your watermark to use on other images. Hit the Apply button and click Save in the top right corner. Now, your image is protected from stealing and ready to be shared.
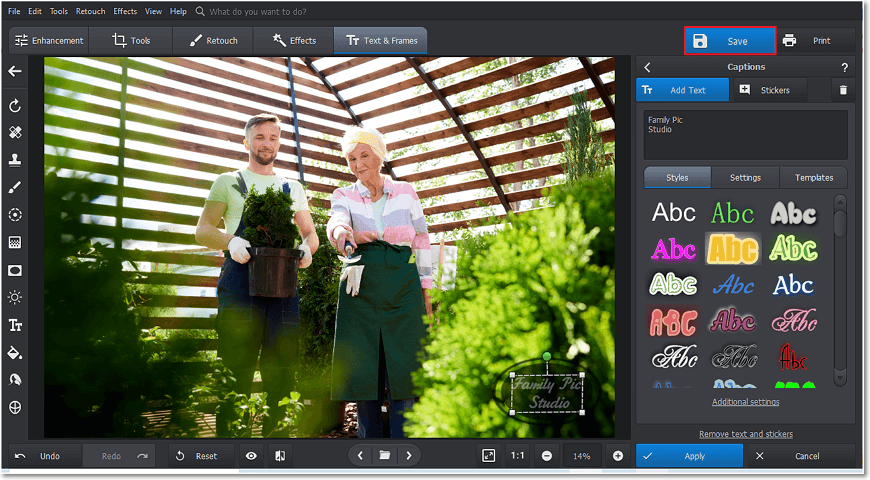
Show your stunning photo to the world.
PhotoWorks makes editing easier than ever and saves much time on branding your images with its Text Templates feature. Additionally, you can use the software for other purposes: make the background of a picture transparent, add a frame, reduce noise in images, fix overexposed photos, and whatnot.
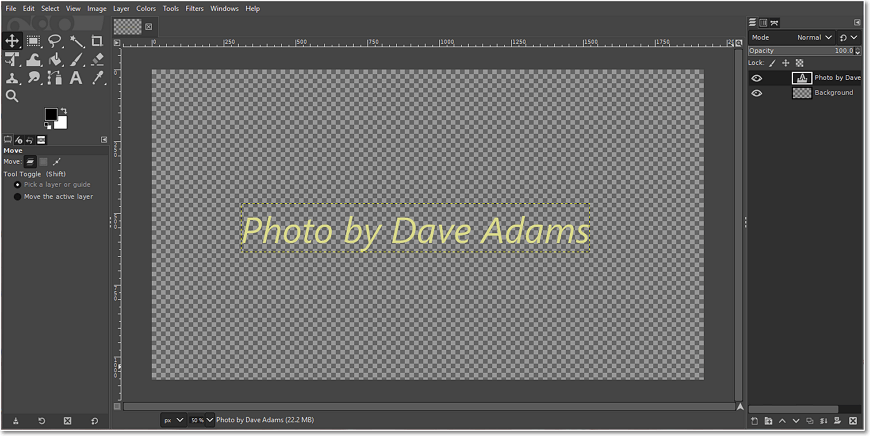
Way 2. How to Make a Custom Watermark in Photoshop
Searching for a powerful program that can give you total freedom in editing? Well, Photoshop, one of the most popular programs in the industry, is exactly that. This software is available to both Mac and Windows users. When it comes to creating a watermark, you can easily do that with this tool. However, the numerous drop-down menus and pop-ups of the Photoshop interface might still make some inexperienced people uncomfortable.
- Upload your image to Photoshop. Click File > Open and find your picture. Then create another layer for your watermark: Layer > New > Layer.
- Enter your text. While on the new layer, select the Text tool, and click any spot on the image. Then, type in your text.
- Change the font. Highlight your text with the Text tool and use the Character submenu to adjust its properties.
- Make the final touches. Choose the Move tool and drag your watermark to a suitable spot. Then use the Opacity slider tool to make the watermark look non-distracting.
- Save your pic. Go to File and save your image in the chosen format. Now your image has copyright and it is secure to share it with others.
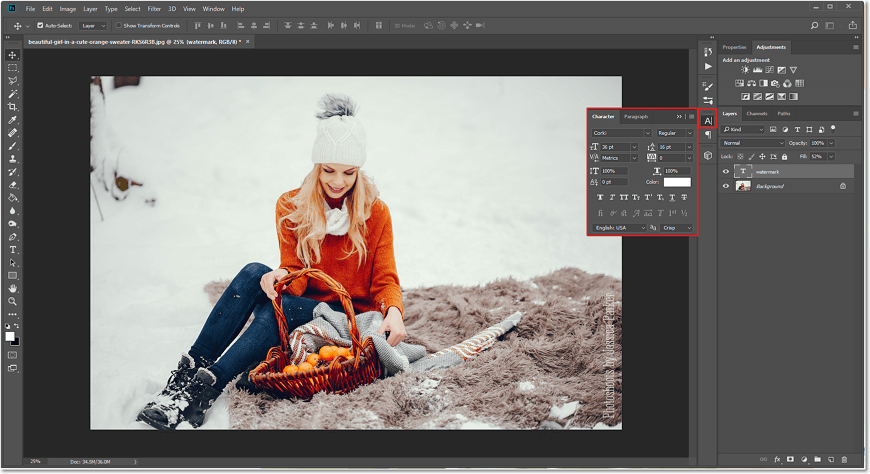
Create a professional-looking watermark in Photoshop
Do you want more information on this way of adding a signature logo? Visit the detailed tutorial on making watermarks on Mac and Windows in Photoshop to have all your remaining questions answered.
Photoshop would be a great choice if you are a professional photo retoucher who works for profit. But it takes time to master this program. So if you have little time and prefer easy-to-navigate interfaces, Photoshop might not be what you are looking for. Also, this Adobe product is too expensive for occasional use. No worries, there are still plenty of alternatives.
Way 3. How to Make a Watermark in MS Word
MS Word is a basic program that the majority of people are familiar with. It is rather intuitive and easy-to-use for all its intended purposes. The best thing about it is that most Windows users have it built into their PCs, so there is no need to install any additional programs. However, the capabilities of this tool are pretty modest, which is why it might not be suitable for everyone. But in case a simple watermark sign is exactly what you want, Microsoft Word will do the job just right.
- Open your pic. Go to the Insert tab > Pictures and choose the image you want to protect by copyright.
- Paste your copyright text. Switch to the Format tab. Change the layout of your picture from Wrap Text to Behind Text. Go to the Home tab and write your text over the image.
- Change the style of your watermark. Stay on the Home tab and change the size, color, and font.
- Save your image. Once you have placed your watermark over your photo, go to File > Save, and you are done.
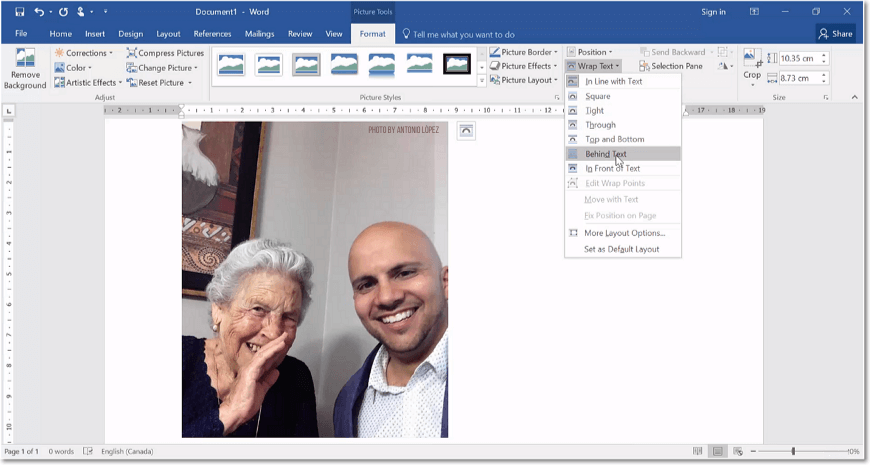
Make a watermark in a couple of clicks with MS Word
Adding a watermark in MS Word is as easy as ABC and takes just a minute of your time. But keep in mind that this program is not too diverse in features, so you won’t be able to create a super original and unique watermark. Besides, the program is not available for Mac users.
Already have a well-designed logo or watermark sign? You can add it to your picture in PhotoWorks by using the Image Overlay tool. Learn how to overlay pictures in a couple of clicks to ease and speed up your work.
Way 4. How to Create Watermark for Photos with Lightroom
Lightroom is a powerful program from the Adobe family that looks similar to Photoshop. However, it has some advantages over its elder brother. The biggest one is that it employs nondestructive editing technology. That means that your original photo will not be changed and you’ll be able to put different watermarks on your pic as many times as you like. Besides, Lightroom is much easier to use because it was designed for those who do not need all the functionality of Photoshop. However, it might still turn out too complicated for beginners and too expensive for occasional users. In case complexity isn’t a problem for you, let’s move on to the tutorial:
- Insert your picture. Go to the Library tab > Import and select your pic. The software will create a journal of changes for your image, not making any modifications to your original pic.
- Create a watermark. If you are a Windows user, stay on any module, click the Edit tab > Edit Watermarks. In case you have a Mac, go to Lightroom Classic and click Edit Watermarks. Then, choose whether you want an image or a text watermark to protect your pic.
- Modify your watermark. Insert your logo if you have chosen a graphic watermark: click Choose in the Image Options and find your PNG or JPEG. Opted for a text sign? Paste your text under the preview section and change the settings: color, font, style, alignment, and shadow. Adjust the opacity, anchor, inset, and size.
- Save your picture. Got a professional-looking watermark on your pic? Just switch to the Library tab > Export, and choose the format you want your watermarked image to be saved as. Now, your pic is ready for sharing.
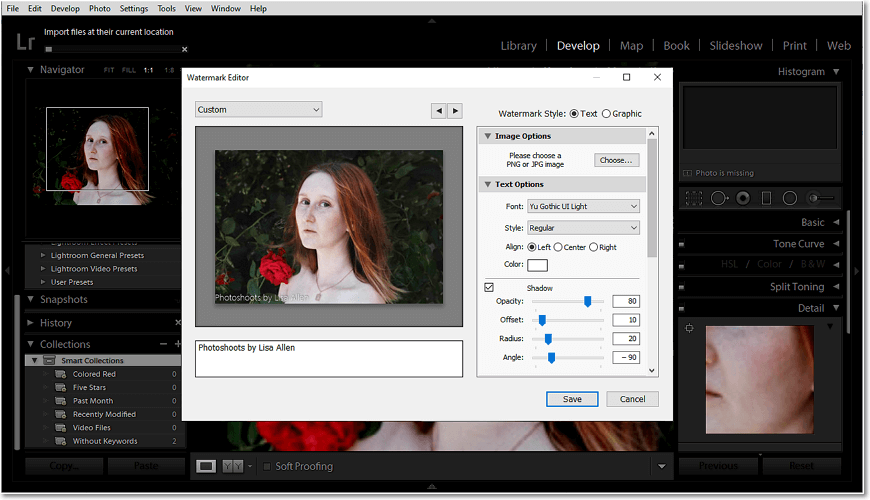
Secure copyright and preserve aesthetics with Lightroom
Do you feel that not everything is clear about this way of putting a watermark on your image? Have all your misunderstandings cleared up by going to the official Adobe Lightroom tutorial.
Making watermarks with Lightroom is clearly easy and smooth. Additionally, this program is available for both Windows and Mac OS and has a diversity of fonts and styles. So you will surely be able to make beautiful and impressive copyright signs. But in case the program feels too advanced for your skill level, there is no reason to buy its expensive license. You might want to consider finding an alternative.
Way 5. How to Make Your Own Watermark in GIMP
Searching for a free photo editor to watermark your photo? Try GIMP, a multifunctional program for editing photos. It is not too complicated to use, but its interface with no icons might get you confused at first. What’s more, GIMP requires supporting programs. They are free, but it might not be too convenient for you to download a whole set of software to do a single job. For instance, to place the watermark that you have created in GIMP onto your picture, you’d need to download Arclab Watermark Studio. If that is totally fine with you, let’s get to the tutorial:
- Create your watermark in GIMP. Make a transparent canvas: go to File > New, open Advanced Options; in the Fill with drop-down menu, choose Transparency.
- Type in your text. Select the Text tool in the top left bar, click any spot on the canvas and type in your text. Change the style, color, size, and spacing of the letters.
- Save your watermark. Go to File > Save As and choose PNG image. You will get a pop-up dialog box if your watermark consists of multiple layers. Just click Merge Visible Layers > Export. Then click Save as PNG > Save.
- Place your watermark in Watermark Studio. Open your image in Watermark Studio, check Image Watermark, choose the PNG watermark you created in GIMP, and find a good place for it.
- Save your image. Click Save in the top bar of the program.
Make a creative watermark for your photography for free
Got any questions about creating a watermark with GIMP? Visit the official illustrated tutorial to help you with them.
It is nice to have such a cool photo editor as GIMP at hand for free, especially if you are trying to save up money. However, not everyone might want to deal with having to install numerous programs. So weigh on your priorities before choosing this software. In case you want to invest in a handy paid program for long-term use, consider alternative options.
Have a hazy pic that needs editing before you can watermark it? Learn how to make a picture less blurry in PhotoWorks.
Way 6. How to Make a Watermark for Photos Online
Prefer online tools to desktop softwares? Have regular access to a stable Internet connection? Here is a cool way to watermark your photos - use BeFunky, a multifunctional online tool for editing pictures. There are many things you can do with it: touch up pictures, add frames, create collages, and so on. When it comes to watermarks, you can use the tool to add text or a logo to your pic and create a template of your watermark to use on your photographs later. But keep in mind that most features of BeFunky are only available with a subscription, and you still have to log in to use the free tools. Everything sounds fine to you? Let’s move on to the tutorial then.
- Create a layer for your watermark. Upload your image. Find the Background tool in the Edit toolbar on the left. Check Transparent and apply the changes. Set the size of your canvas (200px x 100px is best if you are making a text sign; for a logo use 200x200).
- Make your watermark. Go to the Text tab and click Add Text. Paste your text into the textbox. Use the Text Properties menu to adjust the setting: style, color, font, and others. If you go to the Graphics tab, you can add a background to your text. Make sure your watermark occupies most of the canvas. Click Save > Computer > PNG.
- Put your watermark on your picture. Drag & drop your image into the first screen of the online editor again. Then click Save > Computer and check Use Watermark. Click the Create Watermark button when it appears. In the Watermark Template Editor, click Upload Watermark and choose the file with your watermark.
- Customize the watermark template. Adjust the opacity, size, and padding of the watermark, find a good place for it. Like the result? Hit the Save Template button and use your template right away. Done!

Come up with a stylish photography watermark in BeFunky
Want to learn more about this way of adding a watermark or about the tool itself? Visit the BeFunky step-by-step tutorial.
BeFunky is convenient for those used to working online. There is no need to download additional programs and the subscription is comparatively cheap. Besides, you can make watermark templates to add to your photographs later on. However, if you’ve never used online tools, BeFunky might make you uncomfortable due to the necessity to upload your pictures to the Internet.
By now you have learned 6 ways of how to make your own watermark. It doesn’t matter whether you are a Mac or a Windows user, a newbie or a professional photographer, a person searching for a good bargain or someone who wants to invest in buying powerful software. Among the programs we have explored today, you are sure to find the best one for you personally.
But there is a program that meets the interests and tastes of the majority - PhotoWorks. This photo editor is a tool with good value for its price. What you are paying for is a mighty AI-powered program that does all the hard work for you and can help you make pro-level edits in a couple of clicks. Apart from watermarks, there are also such features as tone mapping, Curves, denoising, 3D LUTs, and filters that you as a photographer might find very useful.
