
How to Edit Portraits in Photoshop in a Smart Way
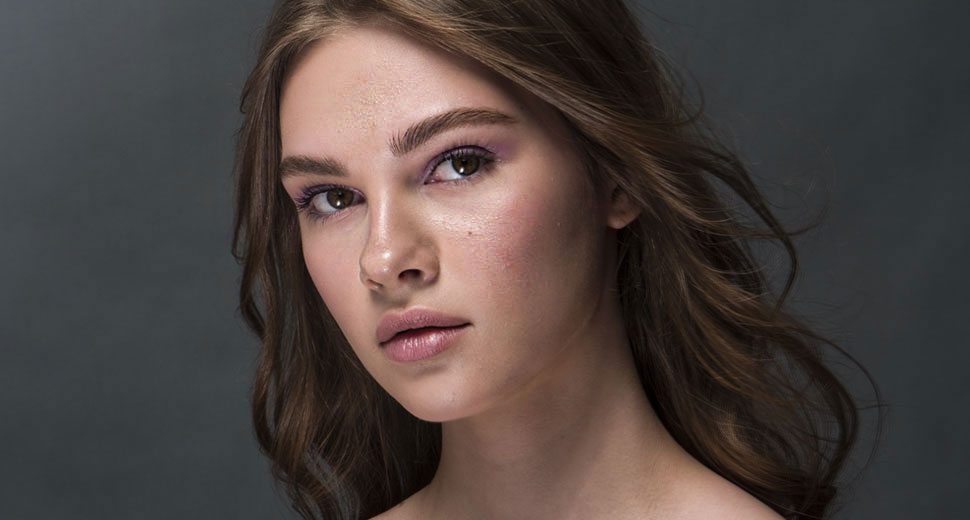
Portrait photography is one of the most popular genres. Each face is unique: a stunning mix of natural beauty and little flaws like spots and wrinkles. That’s why shooting portraits is not a simple task. You need to underline the person’s best features and conceal the flaws. It’s not always possible, and you have to call for “super powers”: open a photo editor to fix the picture digitally.
Most professional photographers will suggest editing pictures in Photoshop. This software is jam-packed with various features, but it has a pretty rocky learning curve. How to edit portraits in Photoshop without wasting lots of time and reading endless guides? In this article, we’ve gathered all the useful tips for pro-level portrait retouch, and spiced them with a step-by-step tutorial. So, open your Photoshop and let’s start!
Apart from the steep learning curve, Photoshop requires a monthly subscription. Don’t want to pay for it? Switch to a different program. There are many alternatives, but we suggest checking out PhotoWorks. This is a smart portrait editor powered by AI. Use its advantages to photoshop portraits in a click. Apply Portrait Magic with dozens of ready-made presets to retouch skin automatically. It’ll save lots and lots of your time.
How to Photoshop Portraits Step-by-Step
Before following the steps below, pick the best photo from your shooting session. Culling pictures is crucial because instead of fixing the fundamental problems like a bad angle or wrong perspective, you will actually work on retouching the portrait.
Once you’ve done that, follow these steps:
Step 1. Make Basic Adjustments in RAW
Pro-level photographers recommend shooting pictures in RAW only because, in this case, your image isn’t affected by the camera settings. Can you edit portraits in Photoshop using a RAW file? Will there be any difference?
- Open your RAW photo. Photoshop will use Camera RAW to show the file. It lets you perform basic edits before starting the actual retouch.
- Move the Highlights slider to brighten up the model skin and make the well-lit areas look more natural.
- Slightly increase the picture clarity to make the model’s gaze irresistible. Don’t worry about the skin flaws popping here and there - you can conceal them later.
- Click Open Image to apply the changes and continue your work with the file.
We don’t recommend touching Exposure, Contrast or perform other global adjustments. It’ll make the shades too dark, and you won’t be able to fix them later.
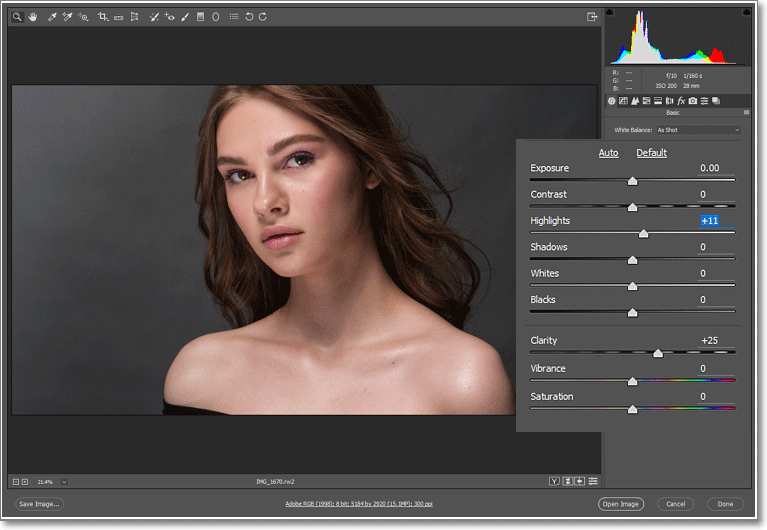
Open your RAW photo in Photoshop
Step 2. Crop Your Image to Get Rid of Empty Space
When you retouch portraits in Photoshop, try drawing focus to the person’s face. Get rid of any extra space: empty background, strangers, unwanted objects that are too distracting. The easiest way to do that is to crop the photo.
- Choose the Crop tool from the toolbar on the left. The cropping grid will appear.
- Adjust the crop area by moving the grid edges. You can select a different preset from the drop-down list in the top menu bar: square, 4:5, 2:3, etc.
- Hit Enter on your keyboard to apply the crop.
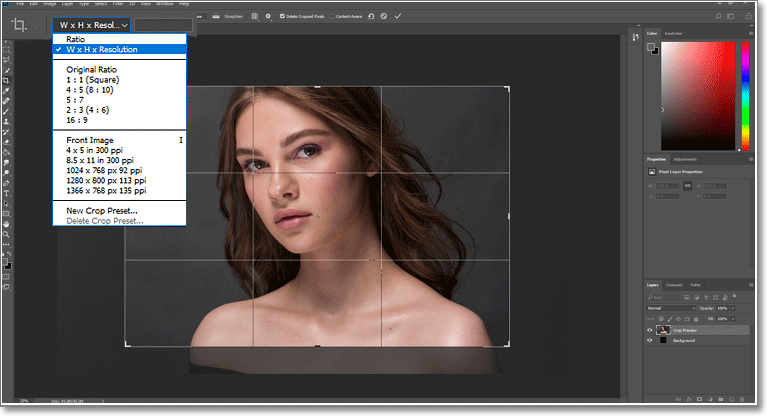
Pick a grid that will help improve the composition
With different cropping grids, you can find interesting balance between the empty space and the key objects on your photo. However, Photoshop doesn't have many grids to offer. Crop a portrait photo with PhotoWorks instead. Get advantage of both vertical and horizontal cropping presets, as well as various grids: the Rule of Thirds, the Golden Ratio, the Spiral, etc.
Step 3. Remove the Flaws and Smooth the Skin
How to edit portraits in Photoshop if your model has a flawed skin? You’ll have to deal with spots, wrinkles, pimples and uneven skin tone. Is it possible to remove these flaws without turning the skin into spotty mess? You can use the Healing Brush and conceal them in a few clicks:
- Select the Healing Brush from the toolbar on the left. Change its size if necessary.
- Hover the cursor over the imperfection and make a left click. Photoshop will fix the flaw automatically by copying and pasting pixels from a nearby area.
- Keep clicking and making small strokes to fix all the flaws. The Healing Brush is usually very precise, but you can change the area from which it takes new pixels. Hold the ALT key on your keyboard and make a left click. The brush will take pixels from this spot.
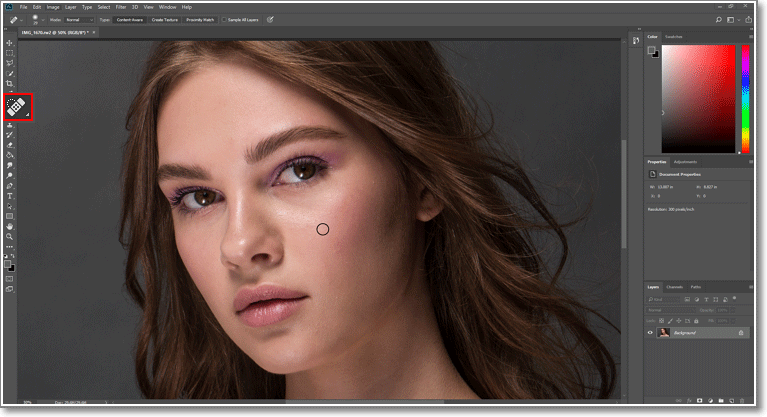
Adjust the brush size to cover each flaw perfectly
Don’t have time to sit and make endless clicks to cover all the spots? Use PhotoWorks to remove blemishes from photos. With the smart Portrait Magic feature and convenient brushes, you will be able to make any skin perfect in no time at all.
Step 4. Even the Skin Tone: No More Redness
Have bigger problems like post-acne with lots of small red spots? Even if you try to conceal them with the Healing Brush, you’ll waste lots of time and get a very strange tone. How to photoshop such portraits without getting “plastic” skin in the process? Pro-level photographers use the frequency separation method. In this case, you work with layers and their modes. Sounds too hard? Let’s do it step-by-step:
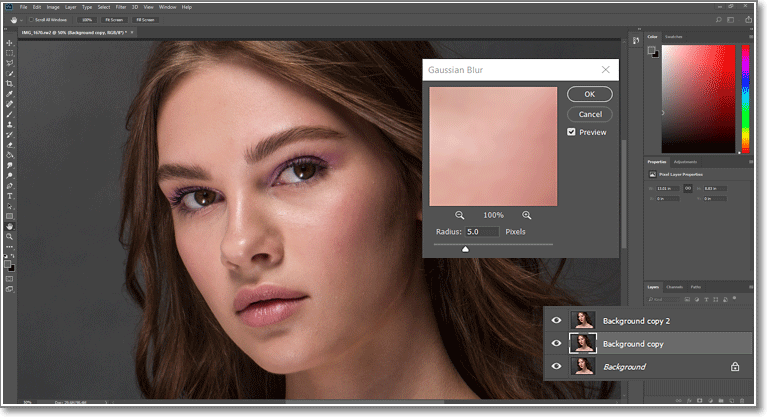
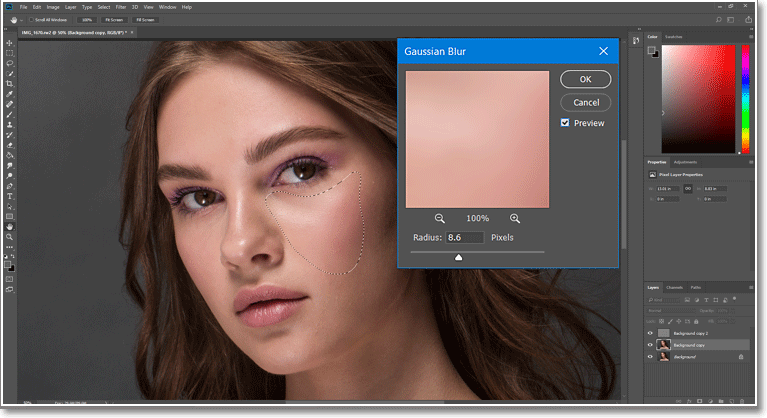
- Right-click your main layer and duplicate it two times. Select the first layer and go to Filter > Blur in the top bar. Apply Gaussian Blur, set its strength around 4.5 - 5.0. You will get a blurred layer where you can fix the skin tone mismatch.
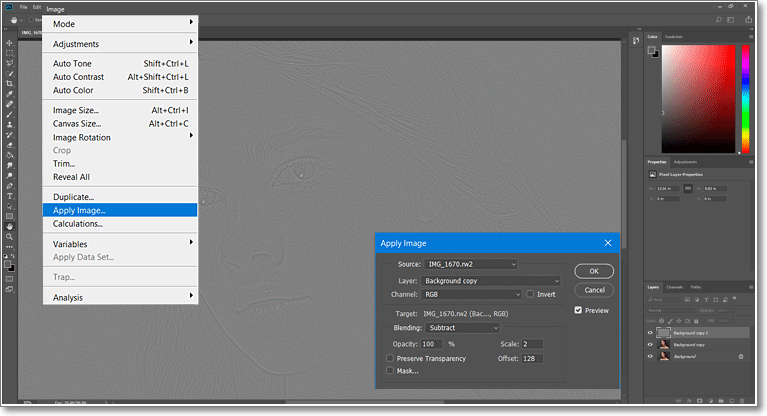
- Select the top layer and go to Image > Apply Image in the top menu. A new window will open. First, set your blurred layer in the Layer field. Then choose Subtract as the blending mode. Finally, set Scale to 2 and Offset to 128. Click OK.
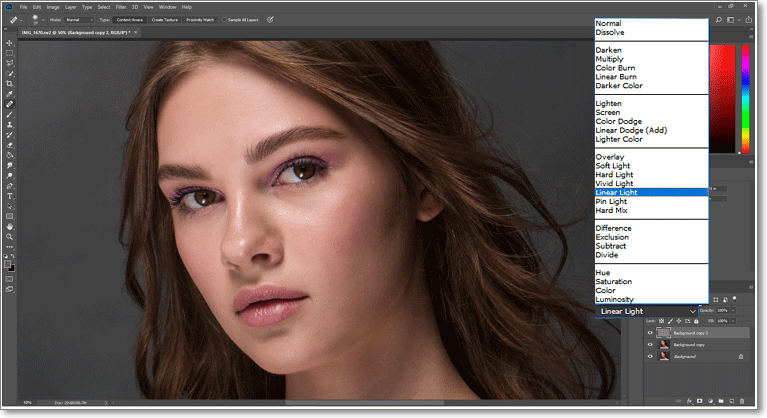
- You will get a grey layer that has all the texture details from your initial photo. Select the layer and switch its blending mode into Linear Light. The grey tone will disappear.
- Now choose the blurred layer again. Pick the Selection tool from the toolbar on the left. Make a small selection over the problem area, set its Feather to 27 pixels - that will make the selection edges smoother. Apply Gaussian Blur to this selection (Filter > Blur > Gaussian Blur) and set its strength to around 7 pixels. This will even the skin tone.
- Choose the texture layer on the top. Pick the Stamp tool from the toolbar. Set its size and make a click over the flaw, for example, a large pimple. It will be removed automatically, however, it won’t affect the overall skin tone in any way. Keep it up until you’re satisfied with the result.
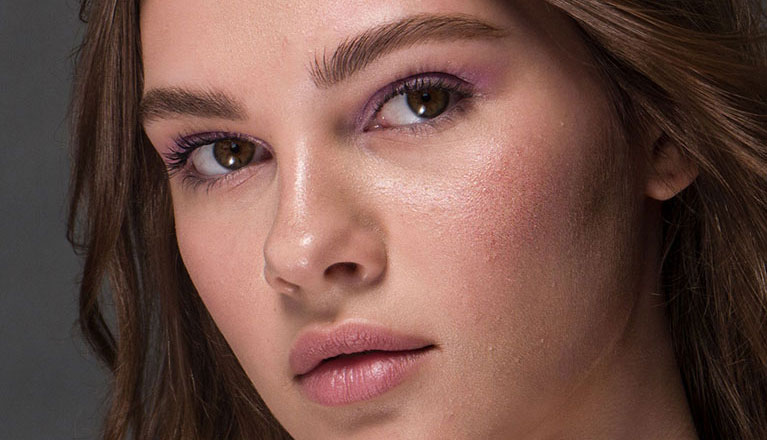

Before and after performing frequency separation
Apart from spots and wrinkles, the wrong lighting can highlight oily skin and create nasty glare. Removing these imperfections all together can take lots of time and patience. If the frequency separation comes out too hard for you, remove glare with PhotoWorks without diving into the layers management.
Step 5. Add Dimension to the Face Digitally
The facial features in your photo look flat and unexpressive? Add some dimension to them! Highlight cheekbones, hide a wide jaw, make the nose thinner - all of that with the Dodge & Burn technique. Here are the steps:
- Select the Dodge tool from the toolbar. Set its Exposure at 15%.
- The Dodge tool highlights the painted area, so add a few strokes to the forehead, tip of the nose, cheeks, lower lip and chin. You can add a few strokes to shoulders and the collarbone.
- Now select the Burn tool - it makes the shades stronger. Set its size and exposure. We suggest keeping the strength at 15%. Place some strokes near the eyes, nose, under cheekbones, lower lip and jawline.
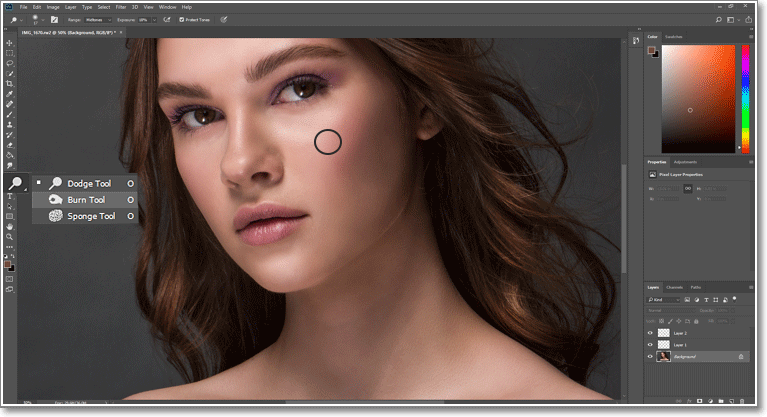
Try to predict where the light comes from and place the strokes in accordance with it
Don’t place too many and too large strokes, otherwise the skin will look plastic. Want to avoid that? Go the other way and use layers. Just add two layers and set both to Overlay. Then use the black brush to add shades, switch to the white color to lighten the painted areas. If the effect is too strong, lower the layer opacity.
Use this technique to fix other flaws, like yellow teeth, for example. However, instead of messing with various brushes, you can quickly whiten teeth in pictures with PhotoWorks with a single drag of the slider.
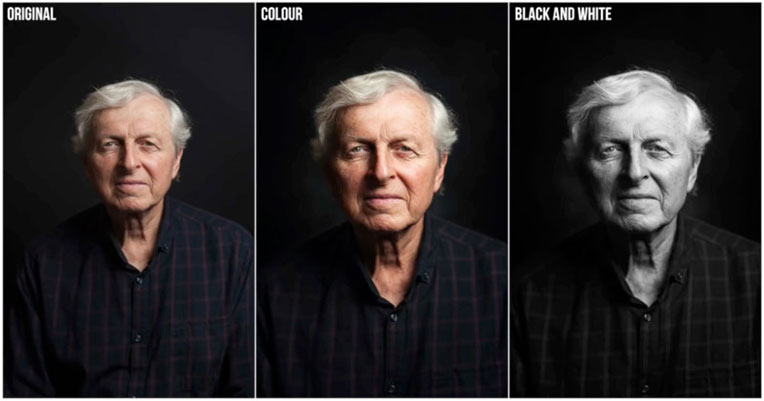
Step 6. Correct Color With Curves
Colors on your photo look unnatural? The shades have some strange tints? You can fix this problem by changing the color balance. Use Adjustment Layer for non-destructive editing - you can easily take a step back and disable the layer anytime. Here are the steps:
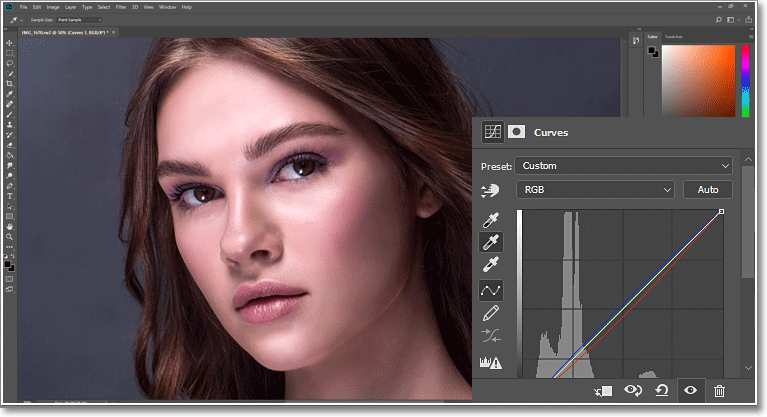
- Go to Layer > New Adjustment Layer. Choose Curves from the dropdown list.
- A new window will open. You will see the curves histogram and a bunch of eyedroppers on the left. Select the Eyedropper tool that samples the image to set a grey point.
- Use this eyedropper to select the area that’s the closest to the grey color. Once you do that, Photoshop will change the color balance automatically based on the settings from the selected sample.
Selected the wrong sample? No problem, just undo the action and try again
Getting the sample closest to the grey color might be difficult. How to spot the right area? Add a new Threshold Adjustment Layer (Layer > New Adjustment Layer > Threshold). You will see your image turning into black and white. Lower the layer strength until you see the first black spots. They are the original areas you need. Disable the Threshold layer and sample one of those areas.
Don’t want to mess with layers and eyedroppers? You can correct colors and adjust white balance in mere seconds with PhotoWorks. Its powerful AI will analyze your image and apply the best settings to pump up the picture back to perfection. What’s more, you can apply 3D LUT color correction and play around with 150+ photo filters.
Step 7. Increase Sharpness to Bring Back Details
Pro-level photographers often make their photos look “crispy”, full of little details. Can you edit portraits in Photoshop in the same way? Sure! However, simple sharpening won’t work - you need to use a special filter. Follow the steps below:
- Go to Filter > Sharpen in the top menu. Choose Unsharp mask.
- The preview will show you the actual result. Use the Amount slider to control the sharpening strength. If you want the filter to be more prominent, increase its radius. Don’t set the parameters too high though because you can create digital noise or even get some artifacts on the edges.
- The recommended settings are 30% Amount, 1.2 Radius and 0 Threshold. This will give your picture a slight crispy look you eagered so much. Click OK to apply the filter.
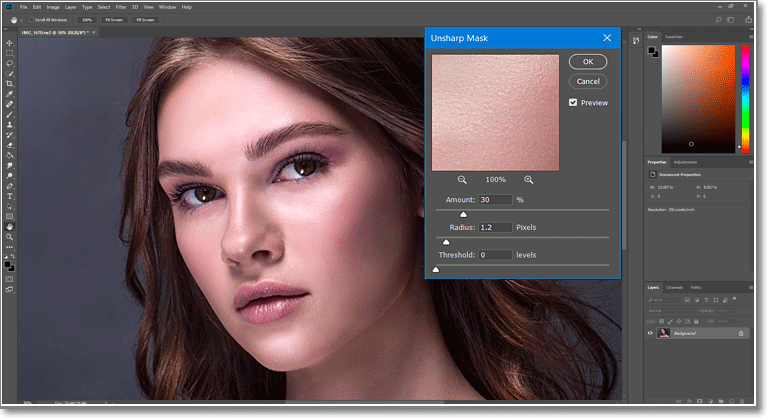
Think the photo is too sharp? Try to lower Amount when applying Unsharp Mask
Step 8. Save Your Retouched Photo
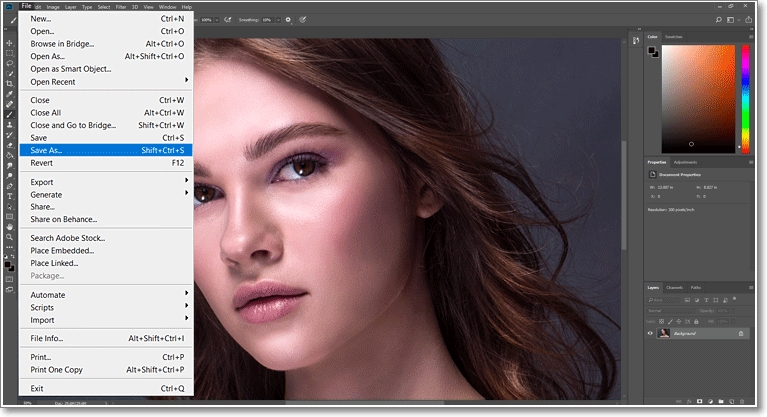
It may not be obvious, but the format in which you save your photo is also very important. It determines the final quality of your photo and amount of details you’ll have. For example, it’s better not to save your photo in JPEG, especially if you plan to print it. Due to high compression, the image will lose most of the details. So, what format should you choose?
- Go to File and choose Save As. You can also hit Shift + Ctrl + S combination on your keyboard.
- Open the dropdown list to see all available formats. If you need to print your picture, for example, to build a portfolio, choose the TIFF format. It’ll preserve all the detail since it’s lossless. If you need a file of smaller size but still strive to save all the details, pick PNG.
Want to have a back-up of your picture? Save a copy in PSD as well
Last But Not The Least
These are 8 steps you can take to bring your retouching skill to a new level. Need more portrait editing tips? One of the most popular websites among pro-level photographers, Fstoppers, gives you a complete guide with short videos on the most difficult steps. There you will also find a bunch of useful tips on making Photoshop edits for portraits.
If you want a complete video guide, check out Sean Tucker’s thread on PetaPixel. Sean is a famous photographer with enormous experience, who has a unique approach to photo editing. If you are too lazy to read the thread, here’s the video:
Now you know how to touch up portraits in Photoshop and you’re just a few steps away from creating a pro-level shot. However, if you are not a tech-savvy, some of them might be a bit difficult to perform. Don’t have time to rise to this challenge, check out PhotoWorks. With this software, you can easily smooth skin, make color correction, apply photo filters and increase sharpness with ease.
Want to get started right away? Grab the free trial version together with a bunch of free tutorials! Don’t waste any more time - go and perform stunning portrait retouches.
Want to Learn How to Edit Portraits in Photoshop?
Try intelligent photo editor for PC and Mac by PhotoWorks instead!
