
 Download
 Download
How to Remove Unwanted Objects from Photos - Best 5 Ways
Have you ever taken a great shot that came out ruined by a tiny flaw? It’s a familiar story and even the best of us can’t always avoid situations when a perfect scene is interrupted by a sudden car driving in the background or dust that got on the camera lens. The list of such nasty stuff can go on forever, including unsightly pimples on the face, dirt on the subject’s clothes, the tip of your finger visible in the photo or a garbage bin spoiling the atmosphere of your shot. How to remove something from a picture without affecting its other parts?
In this step-by-step tutorial, we will show you 5 best ways to remove an object from a photo in 2026. You will find out how to do it on PC, Mac, online, and even on the go. The list has both advanced and easy-to-operate editors, so you will surely find the one that meets all your preferences and needs.
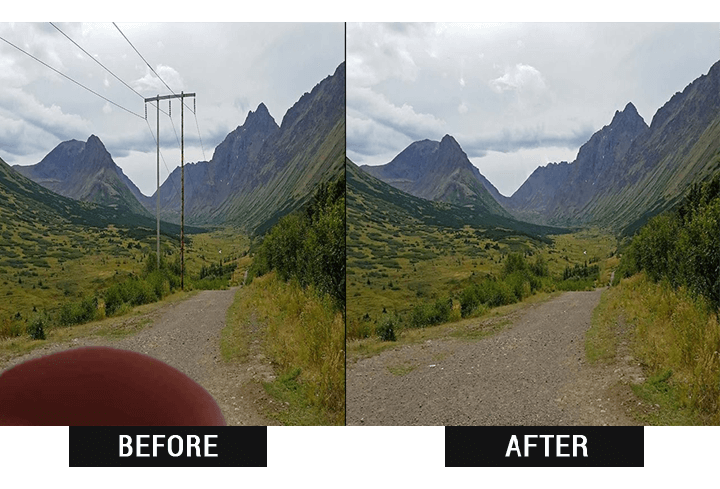
How to remove an object from a picture: compare the initial photo and the result
Now, it’s time to dive into the tutorial! Check out the content to easier switch between the 5 editing ways we have for you:
- 1. Erase extra objects in pictures on Windows and Mac
- 2. Delete items from photos with a mobile app
- 3. Get rid of things in images with Photoshop
- 4. Edit out unwanted objects in pictures online
- 5. Remove unnecessary items in images on Mac
Way 1. How to Remove an Object From a Picture with PhotoWorks
Need easy-to-use but powerful photo software? PhotoWorks is your perfect choice in this case. This photo editor for Windows and Mac offers you two powerful tools to delete all kinds of unwanted objects with minimum effort - the Healing Brush and the Clone Stamp. Dive into the tutorial and you’ll learn how to improve your photos using both of these adjustment tools to your benefit.
But before we get down to the steps, arm yourself with this lightweight photo editor - download the installation file to your computer.
Now that you have the easy-to-use PhotoWorks at your fingertips, you can start the program and remove unwanted objects from photos straightaway.
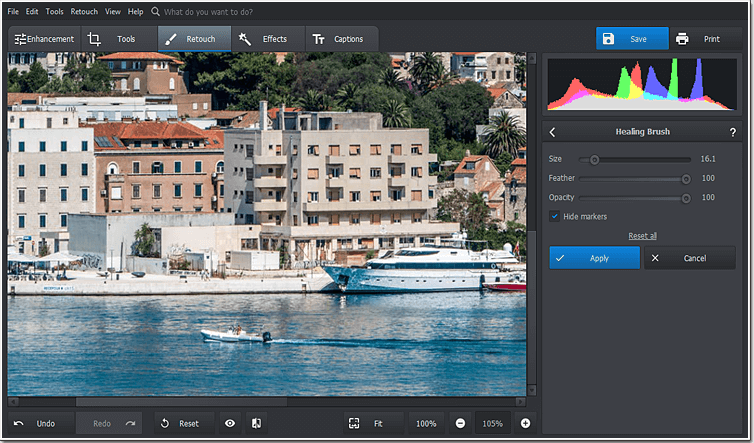
Step 1. Choose the Healing Brush Tool
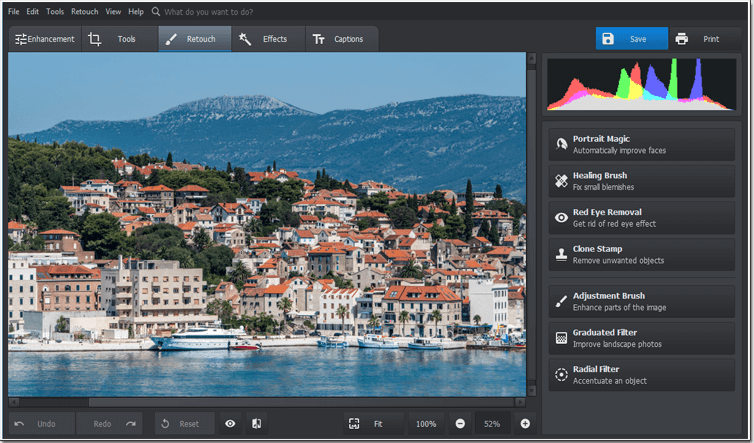
Launch PhotoWorks on your computer and move to the Retouch tab. There you’ll find plenty of tools for editing your portrait and landscape shots. Click the Healing Brush button to get rid of tiny imperfections and fix small flaws. Keep in mind that this tool works better on smooth and uniform textures and can conceal skin blemishes, smudges, dust spots or other small-sized items.

Let's get rid of the boat and floats in the photo
Step 2. Erase Unwanted Objects
Zoom in your photo by clicking the plus button at the bottom of the program window to take a good look at all the imperfections you need to erase. Set the proper brush size to save only the chosen area and leave the rest of your picture as it is. Don’t forget to adjust the Feather and Opacity settings to automatically blur the edited parts and achieve a more natural look.
Delete small elements from your pics with the Healing Brush
Step 3. Compare the Initial Photo and the Result
After applying this object removal tool to your ruined photo hold the Show Original button and you’ll instantly see all the places where the Healing Brush has concealed imperfections. Otherwise, you can click Before / After and the program will show you both the initial and the edited shot side-by-side to better compare them.
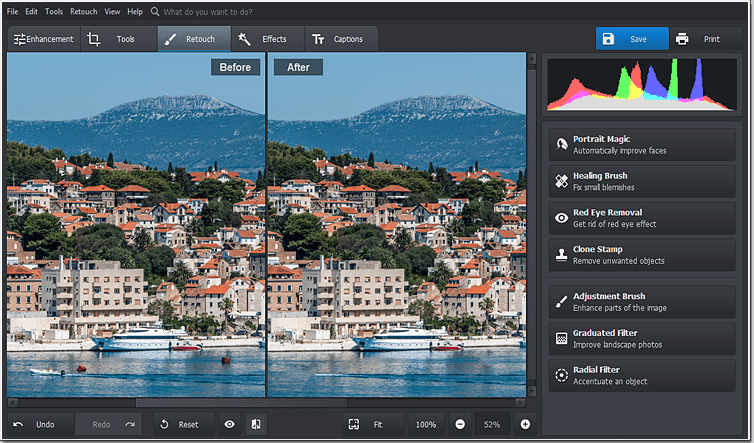
Hit the Before/After button and see the boat and floats deleted
Want to remove a person's face from your photo and replace it with your own? It's pretty easy with PhotoWorks: use the background replacement tool to make a face swap on a PC.
Step 4. Use the Clone Stamp for Removing Bigger Objects
The Clone Stamp is another type of an object eraser available in PhotoWorks. It lets you move, remove and duplicate entire areas of your photograph to delete large distracting elements. The tool borrows some pixels from an adjacent area and places this sample over the damaged pixels. While on the Retouch tab, push the Clone Stamp button. The good news is you can use it alongside the Healing Brush.

Pick the Clone Stamp to get rid of larger objects
Step 5. Adjust the Clone Stamp Settings for a Flawless Result
To completely erase unwanted objects from your picture, adjust the brush size of the Clone tool to edit only the chosen area. If needed, change the opacity and feather settings to soften the edges of the edited zone and merge it with the rest of your photo.
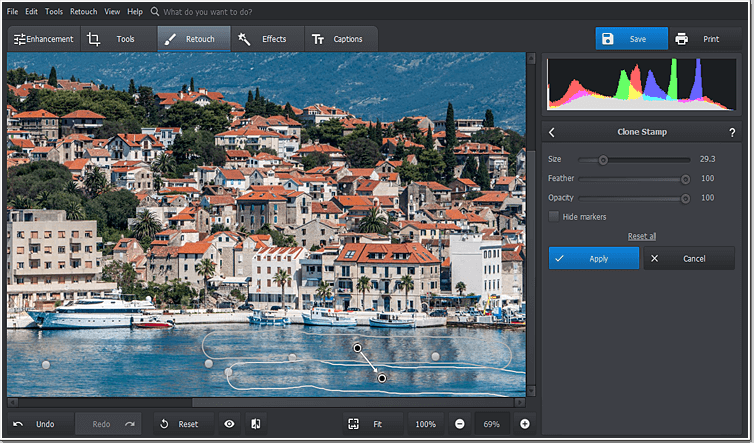
Conceal the waves made by the boat using the Clone Stamp
Place the mouse pointer over the thing you need to remove and carefully paint over it. The program will outline the ‘donor’ area. If the edges of some objects are still visible, simply rearrange the source area to fully conceal the undesired element.
Here is the edited picture without any distracting elements
Prefer video lessons to written manuals? Then learn how to easily remove odd objects from your pictures in this video:
Well, there you go - now you know how to remove unwanted objects from your pictures on Mac and Windows in no time. And that's not all PhotoWorks is capable of. Try this smart photo editor for free to enjoy its many powerful tools!
Discover Other Ways to Erase Photo Defects in PhotoWorks
Didn’t find the solution to your photo problem? PhotoWorks offers other helpful tools to edit something out as if these undesired things have never been on your pictures. Below we present another go on the problem of photos ruined by unwanted objects.
Cut Out Unwanted Elements
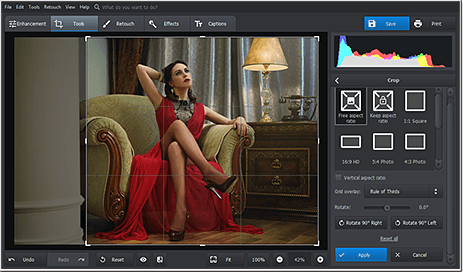
Quickly conceal imperfections and remove odd objects by cropping photos. If you have an undesired element closer to the photo edge, you can easily crop something out. Switch to the Tools tab and click the Crop button. Set the necessary aspect ratio and choose a suitable grid overlay (the Golden Ratio, the Rule of Thirds, or others) to focus on the main subject and leave everything else beyond the picture border.
Conceal Blemishes with Portrait Magic
PhotoWorks offers you a unique photo retouching tool that does a fine job concealing such skin problems as blemishes, moles, glare and redness. Move to the Retouch tab and hit the Portrait Magic button. The program will provide presets for quick one-click enhancement. If you want to edit your portrait shot manually, just switch to the Custom Settings tab and drag the sliders to smoothen skin, decrease glare, get rid of redness, accentuate lips and eyes.

Apart from removing objects from photos, PhotoWorks can help you with tons of other editing tasks: color correction, noise reduction, portrait retouching, and much more. Besides, the software is equipped with a huge library of filters, HDR effects, 3D LUTs, and more. Those will help you add a final touch to your pictures. However, if for some reason this program doesn’t feel like the perfect choice or you are simply not a Windows or Mac user, check out other cool photo editors below.
Way 2. How to Erase Something from a Picture in a Mobile App
Prefer to edit your photos on your smartphone? Then the Remove Unwanted Object app is a perfect solution for you. This automatic Android editor will help you remove anything you want from your picture: wires, scratches, pimples, and whatnot. All it takes is a couple of taps and just a minute of your time. However, sometimes the app doesn’t recognize particular details. So certain parts of the object you are removing might remain in the photo. Head down to the tutorial to learn more about this editor:
- Import your image into the app. As you open the editor, go to Gallery and select the picture you want to edit.
- Choose the Brush tool. Draw a red selection over the object you want to remove from your image.
- Hit the Process button. The selected area will be concealed automatically. In case something other than the selected object was also removed, use the Eraser tool to recover it.
- Hit the Save button. Export your edited picture to the camera roll or post it on socials.
Remove unwanted things from your picture with your smartphone
In case you are searching for an iOS app, check out Photo Retouch-Object Removal. It is a multifunctional editor pretty much similar to the Android one in terms of removing objects. So you just have to follow the steps listed above to operate it. Both editors are intuitive in use and help remove items really quickly. But they are not suitable for professional editing like erasing something from a photo with a complicated background.
Trying to remove scratches and creases from a photo? Check some tips on how to restore old photos with ease to make your picture look even better.
Way 3. How to Remove Things from Photos with Photoshop
Need an object remover to conceal items against a complex background? Then Photoshop is the program to use. This photo editor is renowned for erasing unwanted objects in pictures thanks to its Content-Aware Fill feature. Still, the process remains pretty complicated for inexperienced editors. But professionals will be carried away by the results they can achieve in the program. Check out the tutorial to learn more:
- Open your photo. Go to File > Open and select the image you want to edit.
- Choose the object you want to remove. Use the Lasso tool to draw a selection over the object.
- Remove the selected object. Go to Edit > Content-Aware Fill. Check Show Sampling Area. Click the + icon to add to the reference area and the - icon to reduce it.
- Blend the replaced area. Use the Color Adaptation drop-down option to adjust the blending and output settings.
- Choose the format to export your picture in. Go to File > Save As.
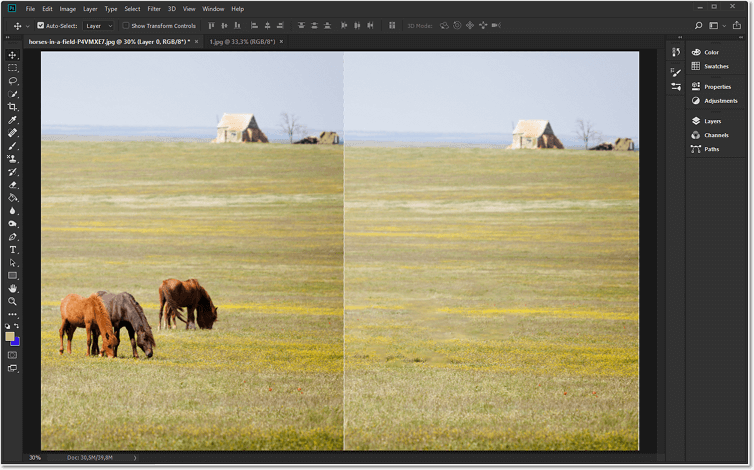
Erase unnecessary things from images in a professional software
Photoshop is effective at removing objects. But for inexperienced people, it might be frustrating to operate. Want to master this way of removing objects regardless? Check out a detailed Photoshop tutorial to explore the process further.
Way 4. How to Remove an Object from a Picture Online
Want to follow the trends and edit your photo online? Or do you simply have no extra memory on your devices for additional downloads? Then, Fotor is a good choice for you. This multifunctional online editor has a handy Clone tool that will help patch up any object you don’t want to have on your image in mere minutes. However, if you have a bad Internet connection or do not want to give websites your personal data, then Fotor might not be the best idea. In case you don’t have these issues, read the tutorial to have a quick start on your editing:
- Import your image to the startup screen. Click Edit a Photo on Fotor’s homepage and drag your picture in.
- Remove unnecessary objects. Go to the Beauty tab and choose the Clone tool. Select a sample area and paint over the item you want to be gone.
- Save your picture. Hit the Export button and choose the needed format and quality for your image. Click Download.
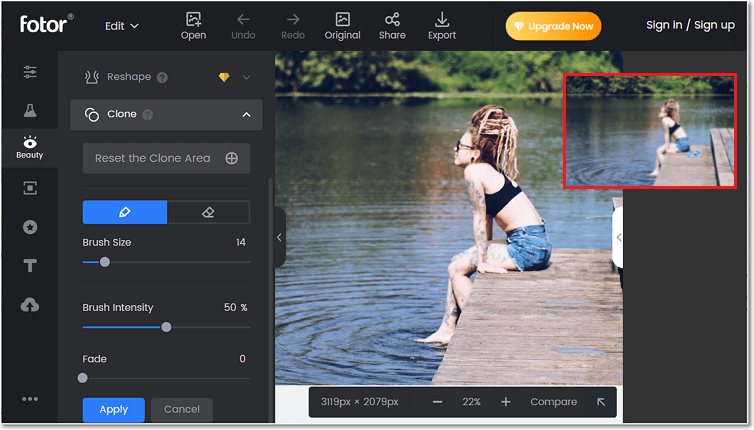
Remove something extra from your photo online
Fotor is a user-friendly photo editor, and anyone can easily figure out how to edit with it. But this online photo editor won’t work if you want to remove an object from a patterned background. Besides, exposing your picture gallery on the internet isn’t the safest idea. In case you still feel that Fotor is a perfect editor for you, visit their official tutorial and start in the program itself.
Wondering how to remove shadows from pictures to make them look perfect? Check out the best ways to do that for people of all skill levels.
Way 5. How to Remove Unwanted Objects in Pics on Mac
Looking for a handy Mac photo editor to remove unwanted details and items from photos? Check out Photo Eraser for Mac! It is an easy-to-use software that can give you a professional result with minimum output required from you. Thanks to its advanced algorithm, the program masks unnecessary objects like they were never there without destroying your image. However, the editor specializes only in removing objects and details from photos. So you would have to use another software to improve your image in terms of color and tone. Now let’s dive into the tutorial to see Super Eraser in action:
- Open your picture in the Super Eraser program. Drag and drop your picture into the editor’s startup screen.
- Paint over the objects you want to remove. Use the Mark tool to remove unwanted things. Choose the Protect tool to brush over the object you want to remain untouched. Hit Apply, and the changes will be made automatically.
- Export your edited picture. Go to File > Save and choose the format you want your picture to be saved in.
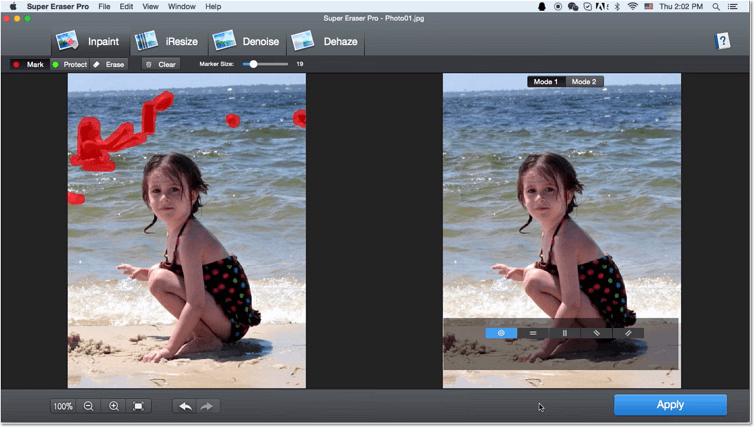
Erase uninvited extra things from your images on Mac
You can use Super Eraser to remove watermarks, captions, people, blemishes, scratches, and much more. The program is automatic, so you won’t need much effort to work with it. But it might seem unreasonable to pay for an editor that can only remove objects unless you do on a daily basis. Liked this way of erasing extra objects in photos? Explore the official website of Photo Eraser to get to know the editor better.
Conclusion
You have discovered 5 ways of how to remove something from a picture and probably have figured your favorite one. But if you haven’t yet, here are some recommendations. Want to remove an object from a photo but don’t need extra programs? Fotor will be just perfect for you. Want to remove something from a photo professionally? Employ Adobe Photoshop. Prefer intuitive editors or don’t have much experience in post-production? Go with the handy PhotoWorks!
PhotoWorks will help you to easily remove anything you want from your picture: people, captions, blemishes, photo defects, etc. It won’t require any photo editing background from you, but will surely provide pro-level results. But no matter what editor from this list you end up with, we hope that this guide was helpful for you.
